Contents
When dealing with mold remediation after water damage, it’s important to act quickly and methodically. You need to assess the situation, ensure your safety, and tackle the source of the moisture. Removing standing water is just the beginning; thorough drying and cleaning are critical to prevent mold growth. Understanding each step is necessary to effectively manage this issue and protect your health and property. Let’s break down the key actions you should take.
Key Takeaways
- Conduct a thorough inspection to identify visible and hidden water damage and document findings with photos for reference.
- Wear appropriate personal protective equipment (PPE) to safeguard against mold exposure during the remediation process.
- Remove and dispose of any materials that cannot be salvaged, such as contaminated drywall, carpets, and insulation.
- Clean affected surfaces using effective disinfectants, ensuring proper contact time to eliminate mold spores.
- Monitor humidity levels and ensure thorough drying to prevent future mold growth, maintaining levels below 60%.
Assess the Water Damage Situation
When you face water damage, the first step is to thoroughly assess the situation.
Begin with an initial inspection to identify the extent of the damage. Look for visible signs like discoloration, warping, or peeling paint, which indicate affected areas. Pay attention to hidden sources of moisture, such as behind walls or under flooring, as these can complicate your assessment.
Document your findings to establish a clear water damage assessment. This includes taking photos and noting the materials affected, the severity of damage, and the duration of exposure to moisture.
Understanding these factors will help you determine the necessary remediation steps.
Addressing the water damage swiftly is essential, as prolonged exposure can lead to mold growth and further complications.
Ensure Personal Safety and Proper Gear
Before starting mold remediation, ensuring personal safety is essential. You shouldn’t underestimate the health risks associated with mold exposure. Equip yourself with appropriate safety equipment to minimize these risks.
First, wear a high-quality mask, such as an N95 respirator, to filter airborne spores. Additionally, use goggles to protect your eyes from irritants and ensure proper-fitting gloves to shield your skin from mold and cleaning agents.
Consider wearing long-sleeved clothing and sturdy boots as added layers of protection. If the mold infestation is extensive, you might even want to invest in personal protective equipment (PPE) like a full-body suit.
Remember, you’re part of a community that values safety and well-being. Taking these precautions safeguards your health and sets a standard for others involved in the remediation process.
Prioritizing safety creates a sense of belonging among those tackling mold issues together.
Identify and Stop the Source of Water
Having ensured your personal safety, the next step is to identify and stop the source of water that contributed to the mold growth.
Begin by inspecting your property for potential water sources, such as leaks from pipes, roofs, or appliances. Check for damp spots on walls and ceilings, as they can indicate underlying issues. Utilize leak detection tools, like moisture meters, to accurately pinpoint problem areas.
Once you’ve identified the source, take immediate action to stop it. This may involve turning off your water supply, repairing plumbing, or sealing leaks.
If the issue is beyond your expertise, don’t hesitate to call a professional. Addressing these water sources promptly is essential in preventing further mold growth and ensuring a safe living environment.
Remove Standing Water
To effectively combat mold growth, you must remove any standing water from the affected areas immediately.
Standing water provides the perfect breeding ground for mold spores, so swift action is essential.
Here’s how you can proceed with water extraction:
Identify the Source: Confirm that you’ve already stopped the source of water to prevent further accumulation.
Use Pumps: Deploy submersible pumps for large pools of water. They’re efficient and can handle significant volumes.
Wet/Dry Vacuum: Utilize a wet/dry vacuum to extract smaller amounts of standing water, especially in confined spaces.
Squeegees and Towels: For residual water, use squeegees to push water toward a collection point, then absorb it with towels.
Dry Affected Areas Thoroughly
After removing standing water, it’s essential to dry affected areas thoroughly to prevent mold growth.
You should utilize effective drying techniques, such as fans and dehumidifiers, and continuously monitor humidity levels to ensure the environment remains dry.
Quick-drying inhibits mold development and helps restore your space efficiently.
Importance of Quick Drying
When water damage occurs, quick drying of the affected areas is crucial for preventing mold growth. The longer moisture lingers, the higher the risk of mold infestations.
To effectively manage drying time, consider these key actions:
Utilize drying equipment: Use dehumidifiers and fans to enhance air circulation.
Identify moisture sources: Locate and address leaks or standing water immediately.
Monitor humidity levels: Keep indoor humidity below 60% to inhibit mold proliferation.
Assess drying progress: Regularly check affected areas to ascertain complete dryness.
Effective Drying Techniques
Effective drying techniques are crucial for mitigating mold risks after water damage. You need to employ various dehumidification methods and ensure optimal airflow throughout the affected areas. This dual approach helps remove excess moisture, greatly reducing the potential for mold growth.
Here’s a quick guide to effective drying strategies:
| Technique | Description |
|---|---|
| Dehumidifiers | Use to extract moisture from the air. |
| Fans | Enhance air circulation for quicker drying. |
| Heated Air | Warm air can speed up evaporation. |
| Open Windows | Promote fresh air flow, if safe. |
| Wet/Dry Vacuums | Remove standing water from surfaces. |
Monitoring Humidity Levels
To prevent mold growth, you must closely monitor humidity levels in the affected areas. Effective humidity control is essential for successful remediation.
Here are key steps to ensure proper moisture measurement:
Use a hygrometer: This device measures humidity accurately, helping you assess the environment.
Maintain levels below 60%: Aim for a relative humidity of 30-60% to inhibit mold growth.
Ventilate properly: Open windows and use fans to promote airflow and reduce moisture accumulation.
Inspect regularly: Check humidity levels daily until the affected areas are completely dry.
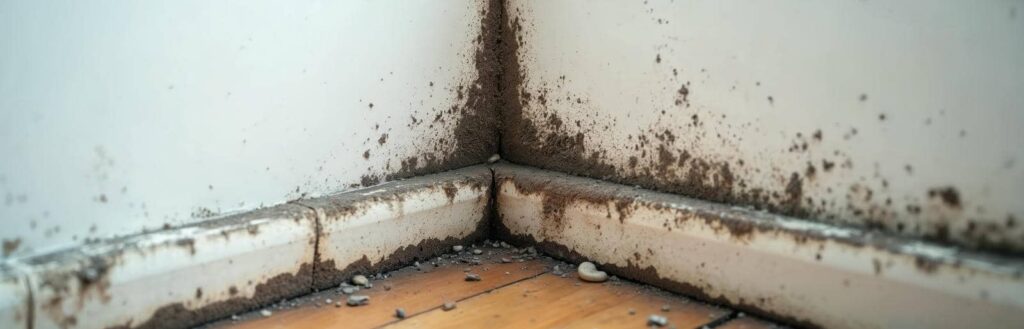
Inspect for Mold Growth
As you begin the mold remediation process, it’s vital to inspect for mold growth thoroughly, since even a small amount can lead to significant health issues and property damage.
Start by employing effective mold identification techniques. Use visual inspection methods to examine areas prone to moisture, such as basements, bathrooms, and around plumbing fixtures. Look for discoloration, a musty odor, or any signs of water damage.
Pay particular attention to hidden spaces like behind walls and under carpets, where mold often thrives. Utilize a flashlight to illuminate darker areas and consider using moisture meters to detect elevated humidity levels.
Document any findings meticulously; this will aid in evaluating the extent of the infestation. By combining these techniques, you can ensure an all-encompassing evaluation, paving the way for effective remediation.
Contain Mold Contamination
Once you’ve identified mold growth, containing the contamination becomes essential to prevent its spread.
Implementing effective mold containment strategies will help you safeguard the unaffected areas of your home. Here are four key steps to evaluate:
Seal Off Affected Areas: Use plastic sheeting to create barriers around contaminated spaces, ensuring no spores escape.
Control Airflow: Turn off HVAC systems to prevent mold spores from circulating. Use fans to direct airflow away from clean areas.
Establish Negative Pressure: Use a HEPA-filtered air scrubber to maintain negative pressure inside the containment area, trapping spores within.
Limit Foot Traffic: Restrict access to contaminated zones to minimize disturbance and prevent further spread.
Remove Damaged Materials
After identifying the extent of mold damage, it’s vital to remove any materials that are beyond salvaging. This typically includes drywall, carpets, insulation, and any porous items that have absorbed moisture.
Following proper material disposal guidelines ensures you handle the removal safely and responsibly. Always wear protective gear, such as gloves and masks, to minimize exposure to mold spores.
Dispose of these materials in sealed plastic bags to prevent further contamination. Check local regulations for disposal methods, as some areas may have specific guidelines for hazardous waste.
Implementing mold prevention strategies is important after removal; consider using moisture barriers and dehumidifiers to deter future mold growth.
By taking these steps, you reclaim your space and foster a healthier environment for you and your loved ones.
Clean and Disinfect Surfaces
After removing damaged materials, you’re ready to clean and disinfect surfaces effectively.
Start by selecting the right disinfectants and employing proper surface preparation techniques to ensure maximum effectiveness.
Use efficient cleaning methods to eliminate any remaining mold spores and prevent future growth.
Surface Preparation Techniques
To effectively tackle mold remediation, you’ll need to prioritize thorough surface preparation by cleaning and disinfecting all affected areas. Proper surface treatment is vital for minimizing mold regrowth.
Here are some essential preparation methods you should follow:
Remove Debris: Clear away any loose materials, dirt, or organic matter from surfaces.
Wash Surfaces: Use a mixture of water and detergent to scrub down all contaminated surfaces.
Dry Thoroughly: Verify all areas are completely dry, as moisture promotes mold growth.
Inspect for Damage: Check for structural damage that may need repair before proceeding.
Disinfectant Selection Tips
Once you’ve prepared the surfaces by removing debris and ensuring thorough drying, the next step is to select the right disinfectants to effectively eliminate mold spores.
Focus on two main disinfectant types: quaternary ammonium compounds and hydrogen peroxide solutions. Quaternary ammonium compounds are effective against a broad spectrum of microbes, while hydrogen peroxide disinfects and breaks down into water, reducing chemical residues.
When applying these disinfectants, make sure you follow the manufacturer’s instructions for concentration and contact time to maximize effectiveness.
Use spray bottles or cloths for even distribution, and consider fogging methods for larger areas.
Effective Cleaning Methods
Three effective cleaning methods can help ensure surfaces are properly cleaned and disinfected during mold remediation.
Utilizing the right techniques ensures you tackle mold effectively and prevent future growth.
Here are four methods you can employ:
Soap and Water: Start with a mixture of warm water and a mild detergent, which helps remove dirt and mold spores.
Vinegar Solution: Use a 1:1 solution of vinegar and water; vinegar acts as a natural mold inhibitor.
Bleach Mixture: Combine one cup of bleach with a gallon of water for non-porous surfaces, killing mold effectively.
Commercial Cleaning Agents: Consider using specialized cleaning agents designed for mold remediation to ensure you follow manufacturer instructions.
Monitor for Future Mold Growth
Although you’ve successfully completed mold remediation after water damage, it’s essential to monitor the area for future mold growth.
Implementing preventive measures is vital in safeguarding your space. Regular inspections should be part of your long-term monitoring strategy. Check for signs of moisture accumulation, which can promote mold development.
Ensure ventilation is ideal, especially in areas prone to dampness, like bathrooms and basements. Keep humidity levels below 60% by using dehumidifiers if necessary.
Using moisture meters can help you accurately assess humidity levels in your environment. If you notice any discoloration or musty odors, act quickly to investigate further.
Frequently Asked Questions
How Long Does Mold Take to Grow After Water Damage?
Mold growth timelines vary, but under ideal conditions, you’ll see mold within 24 to 48 hours after water damage. Factors like humidity, temperature, and material type greatly influence how quickly mold develops in your space.
Can I Use Bleach to Clean Mold?
You might think bleach wipes out all mold types, but it only tackles certain surfaces. Its effectiveness is limited, often leaving behind spores that can thrive. Consider alternative methods for thorough mold remediation instead.
What Are the Health Risks Associated With Mold Exposure?
Mold exposure can lead to various health risks, including mold symptoms like respiratory issues and allergic reactions. You might experience sneezing, coughing, or skin irritation, indicating a need to address mold promptly for your well-being.
Should I Hire a Professional for Mold Remediation?
You should consider hiring a professional for mold remediation. While DIY remediation might seem cost-effective, a thorough mold inspection ensures safety and proper handling, preventing future issues and protecting your home and health effectively.
How Can I Prevent Mold After Water Damage?
Think of your home as a fortress; without proper defenses, mold can invade after water damage. Implement mold prevention tips like reducing humidity and ensuring proper ventilation for effective water damage mitigation, protecting your space and well-being.
Final Thoughts
In the aftermath of water damage, taking swift action is essential to safeguard your home from mold. Picture a damp, dark corner transforming into a thriving mold colony if left unchecked. By following these key remediation steps, you eliminate existing threats and protect your living space from future infestations. Remember, staying proactive and vigilant ensures a safe, healthy environment for you and your loved ones. Don’t let mold take root—act decisively and reclaim your home.
Recent Posts
Top Tips for Storm Damage Restoration at Home
Many homeowners experience some form of storm damage. When faced with such unexpected challenges, it’s
What Are Top Tips for Sewage Cleanup?
Is it really possible to effectively manage a sewage cleanup without proper preparation? Many underestimate
Effective Strategies for Sewage Cleanup and Restoration
When dealing with sewage cleanup and restoration, it’s imperative to approach the situation methodically. You’ll