Contents
When evaluating water damage assessment, a systematic approach is key. Start with visual inspections to identify obvious signs, then utilize moisture meters for precise readings. Incorporating thermal imaging can reveal hidden issues, while water tracing methods help locate intrusion sources. You’ll also want to monitor air quality and check for mold growth. Each step builds a clearer picture, essential for effective remediation. But how do you ensure all findings are accurately documented for insurance claims?
Key Takeaways
- Conduct a visual inspection of ceilings, walls, and floors for water stains and signs of moisture issues like bubbling paint.
- Use moisture detection tools such as pin and pinless meters to quantify moisture levels in affected areas.
- Implement water tracing methods like fluorescent dyes and smoke testing to identify sources of water intrusion.
- Assess structural integrity by checking for warping, cracking, and sagging in floors and rooflines.
- Document damage with high-resolution photos and detailed inventories for insurance claims and air quality assessment.
Visual Inspection Techniques
When you begin a visual inspection for water damage, it’s essential to approach the task methodically to ensure no signs are overlooked.
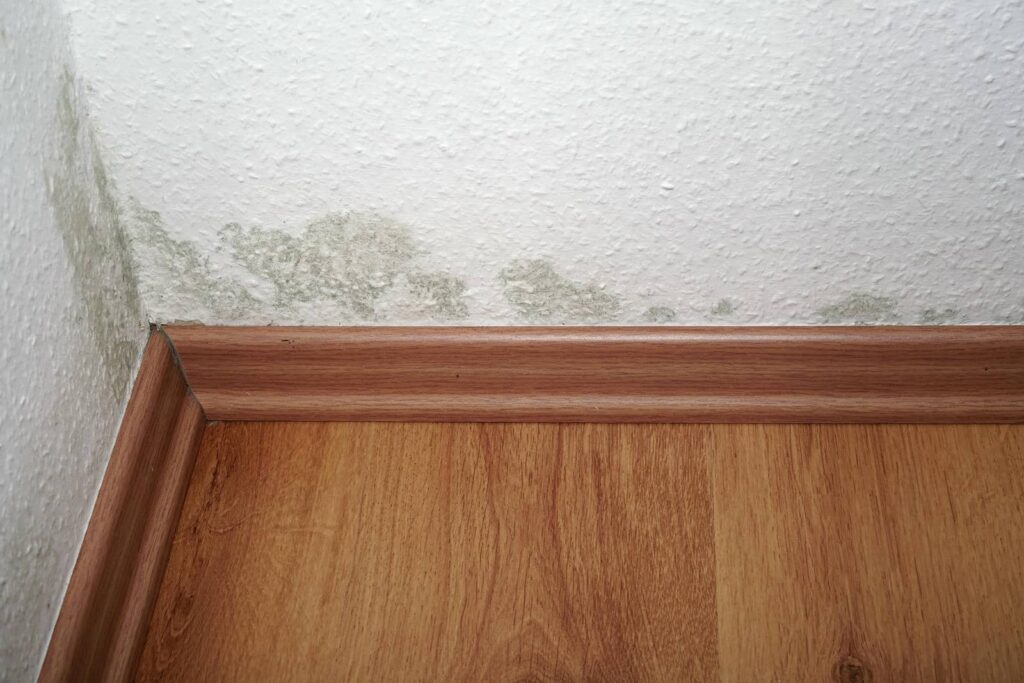
Start by examining ceilings, walls, and floors for water stains, which often indicate past or present leaks. Look for discoloration, bubbling, or peeling paint, as these can reveal underlying moisture issues. Pay attention to damage patterns; for instance, streaks running down walls may suggest roof leaks, while stains near plumbing fixtures can indicate pipe issues.
Don’t forget to inspect hidden areas like basements and crawl spaces, where water damage might be less visible. Use a flashlight to reveal any subtle signs that might escape casual observation.
Document your findings with photos and notes to create a thorough assessment. By following these steps, you’ll develop a clearer understanding of the extent of the damage and the necessary next steps in remediation.
Moisture Meter Usage
When evaluating water damage, using a moisture meter is essential for accurate readings.
You’ll encounter two main types: pin and pinless meters, each suited for different applications.
Understanding how to read moisture levels correctly will help you determine the extent of damage and the necessary remediation steps.
Types of Moisture Meters
Moisture meters are essential tools for accurately evaluating water damage, and understanding their types can greatly enhance your inspection process.
You’ll typically encounter two primary types: digital moisture meters and analog moisture meters. Digital moisture meters provide precise readings displayed on an electronic screen, making them user-friendly and efficient for quick assessments. They’re ideal for identifying moisture levels in various materials, offering features like data storage and alarms for high moisture levels.
On the other hand, analog moisture meters utilize a dial gauge, requiring a bit more experience to interpret accurately. Though less common today, they’re still reliable for basic evaluations.
Selecting the right type for your needs ensures effective moisture detection and enhances your overall assessment strategy.
Reading Moisture Levels
Understanding how to read moisture levels accurately is key to effective water damage evaluation. Start by calibrating your moisture meter according to the manufacturer’s instructions.
When you measure moisture levels, focus on moisture thresholds specific to the materials you’re evaluating. Different surfaces have varying capacities for moisture retention, impacting how you interpret the readings. For example, wood may show higher levels of moisture compared to drywall.
It’s essential to establish baseline moisture levels in unaffected areas to guide your evaluation. Compare your readings against known moisture thresholds to determine whether remediation is necessary.
Thermal Imaging Cameras
Thermal imaging cameras serve as invaluable tools in the assessment of water damage, allowing you to detect hidden moisture behind walls, under floors, and in ceilings without invasive measures.
By capturing heat signatures, these cameras highlight temperature variations that indicate the presence of moisture. When water infiltrates materials, it alters their thermal properties, making it easier for you to identify affected areas.
As you scan the environment, the camera translates these heat signatures into a visual format, providing a clear and immediate representation of potential issues.
This non-destructive method means you can assess extensive areas quickly, preventing further damage and costly repairs.
Using thermal imaging streamlines the assessment process and enhances your overall understanding of water damage dynamics.
Water Tracing Methods
To effectively pinpoint the source of water intrusion, water tracing methods become indispensable in your assessment toolkit. These techniques allow for precise leak detection, enabling you to identify hidden leaks and track their origins efficiently. Water tracing involves using various dyes or markers that can be introduced into the suspected water source, revealing its pathway through the system.
Here’s a quick comparison of common water tracing methods:
| Method | Application | Pros |
|---|---|---|
| Fluorescent Dyes | Pipe & surface tracing | Highly visible under UV light |
| Smoke Testing | Drain and vent systems | Non-invasive and effective |
| Electronic Leak Detection | Walls and ceilings | Accurate and fast |
| Infrared Thermography | Surface temperature analysis | Visualizes potential leaks |
| Pressure Testing | Pipe integrity check | Identifies weak points |
Utilizing these methods can enhance your ability to manage water damage assessments effectively.
Check for Hidden Water Damage
While evaluating water damage, it’s crucial to check for hidden moisture that can lead to mold growth and structural damage. Start by inspecting areas prone to hidden leaks, like behind walls, under sinks, and around appliances.
Use a moisture meter to identify concealed moisture levels, as these readings can reveal issues that aren’t visually apparent. Pay close attention to the smells and discoloration on walls or ceilings, as these can signal underlying problems.
Don’t forget to check insulation and flooring, especially in basements or crawl spaces, where moisture can accumulate unnoticed.
If you suspect hidden leaks, consider using thermal imaging cameras; they can detect temperature differences indicative of moisture presence.
Assessing Structural Integrity
To assess structural integrity after water damage, start with a thorough visual inspection of the affected areas.
Look for signs of warping, cracking, or discoloration in materials, as these can indicate underlying issues.
Next, utilize a moisture meter to quantify moisture levels in the structure, ensuring you identify any hidden pockets of water that could compromise stability.
Visual Inspection Techniques
Visual inspection serves as the first line of defense in evaluating structural integrity after water damage. Start by walking through the affected area, using an inspection checklist to ensure no detail is overlooked.
Look for visual clues like discoloration, warping, or buckling in walls and ceilings, which may indicate deeper issues. Pay attention to joints and seams; they often reveal hidden damage.
Check for sagging floors or rooflines, as these can signal compromised support structures. Don’t forget to inspect windows and doors for difficulty in operation, which may suggest shifting frames.
Document all findings meticulously, as this information will be essential for future remediation and repairs. Your thoroughness can notably impact the recovery process, fostering a sense of security for everyone involved.
Moisture Meter Usage
Moisture meters are essential tools for accurately evaluating structural integrity after water damage.
To ensure effective usage, follow these key steps:
Calibration: Always calibrate your moisture meter before use to ensure precise readings.
Placement: Position the meter at various points—walls, floors, and ceilings—to detect moisture pockets effectively.
Depth Measurement: Use the meter’s settings to assess moisture levels at different depths, particularly in porous materials.
Data Recording: Document your findings systematically to track moisture changes over time and identify trends.
Evaluating Air Quality
When evaluating water damage, understanding air quality is vital, as contaminated air can pose health risks and exacerbate existing problems.
Begin by measuring humidity levels, since elevated moisture can promote the growth of airborne contaminants. Use a hygrometer to accurately assess these levels; ideally, indoor humidity should remain between 30% and 60%. If you find higher readings, it’s important to implement dehumidification strategies.
Next, conduct air sampling to identify specific airborne contaminants. This involves collecting air samples and analyzing them for mold spores, bacteria, and volatile organic compounds (VOCs). Understanding the concentration of these contaminants helps you determine the urgency of remediation efforts.
Finally, use air purifiers equipped with HEPA filters to improve air quality throughout the affected area.
Regular monitoring ensures that you maintain a healthy living environment and effectively manage any potential risks related to water damage. By prioritizing air quality, you protect both your health and your home.
Identifying Mold Growth
To effectively identify mold growth, you’ll want to start with a thorough visual inspection of affected areas, looking for discoloration or unusual patterns on surfaces.
Next, utilize moisture detection tools to measure humidity levels and pinpoint hidden dampness that could promote mold proliferation.
Finally, conduct air quality testing to assess spore counts and ensure that the environment is safe for occupants.
Visual Inspection Techniques
Although mold growth can often be subtle, a thorough visual inspection can reveal its presence and extent.
To effectively identify mold, follow this inspection checklist and look for these key visual clues:
Discoloration: Check for unusual stains or patches on walls, ceilings, and floors.
Texture Changes: Notice any peeling, bubbling, or warping surfaces that may indicate moisture.
Odors: Be aware of musty smells, as they often signal hidden mold.
Humidity Levels: Observe areas prone to dampness, like bathrooms and basements, where mold thrives.
Moisture Detection Tools
Visual inspections are important, but they often need to be complemented by moisture detection tools to accurately identify and assess mold growth. Utilizing advanced scanning methods can help you pinpoint hidden moisture sources that visual checks might miss. Here’s a quick overview of common moisture detection technologies:
| Tool Type | Description |
|---|---|
| Moisture Meters | Measures moisture content in materials |
| Thermal Imaging Cameras | Detects temperature variations indicating moisture presence |
| Hygrometers | Measures humidity levels in the air |
| Infrared Scanners | Identifies moisture behind walls |
| Acoustic Devices | Detects moisture through sound waves |
Air Quality Testing
Air quality testing is essential for identifying mold growth, as airborne spores can greatly impact health and indoor environments.
To effectively assess air quality and detect mold, consider the following steps:
Measure humidity levels: High humidity can promote mold growth; aim for levels below 60%.
Conduct air sampling: Use a specialized pump to collect air samples for laboratory analysis of airborne contaminants.
Inspect visible surfaces: Check for mold on walls, ceilings, and hidden areas to correlate with air quality findings.
Utilize mold detection kits: These kits can help you identify specific types of mold, providing a clearer picture of your indoor air quality.
Documenting Damage for Insurance
When evaluating water damage for insurance claims, it’s essential to document every aspect meticulously to ensure a smooth recovery process.
Start by taking high-resolution photographs of affected areas, ensuring you capture both wide shots and close-ups. Note the extent of the damage, including structural issues, mold growth, and damaged belongings. Create a detailed inventory listing each item, its value, and the specific damage incurred.
In addition to photos and lists, gather any relevant receipts or previous appraisals to support your claims. Make sure to record dates and times of the incident, along with any communications with repair professionals or your insurance company.
This damage documentation serves as vital evidence, making it easier for your insurance adjuster to assess the situation. By being thorough and organized, you’ll enhance your chances of a successful claim and recover your losses effectively.
Engaging Professional Assessors
Engaging professional assessors is essential for accurately evaluating water damage and ensuring a thorough understanding of the situation. With their expertise, they utilize advanced assessment techniques that provide clarity and confidence.
Here’s why you should consider their services:
Professional Certifications: Verify your assessor holds recognized certifications, which validate their training and expertise in water damage evaluation.
Comprehensive Analysis: They perform detailed inspections, identifying hidden moisture and potential hazards that you might overlook.
Advanced Equipment: Professional assessors use cutting-edge technology, such as moisture meters and thermal imaging, to detect water damage accurately.
Tailored Solutions: After assessment, they provide customized remediation strategies that address your specific situation and needs.
Frequently Asked Questions
How Can I Prevent Future Water Damage Assessments?
To prevent future water damage assessments, ensure your drainage systems are clear and functional. Install moisture barriers in vulnerable areas to keep water out, and regularly inspect these systems to maintain their effectiveness and integrity.
What Should I Do Before an Assessment Begins?
Before the assessment begins, think of it like preparing for a storm. You’ll want to identify the water source and thoroughly prepare your property, ensuring everything’s in order to facilitate an effective evaluation.
Are There Any DIY Assessment Methods Available?
You can use a moisture meter to measure hidden dampness and conduct a thorough visual inspection for visible signs of water damage. Together, these DIY methods give you valuable insights into potential issues in your space.
How Often Should I Conduct Water Damage Assessments?
You should conduct water damage assessments regularly, ideally every six months. Incorporate water testing and moisture mapping to identify hidden issues early, ensuring your space remains safe and preventing potential long-term damage from unnoticed moisture.
What Are the Signs of Previous Water Damage?
When you inspect for signs of previous water damage, look for mold growth and discoloration stains. They’re like whispers from the past, revealing hidden problems that could lead to greater issues if ignored.
Review
Effectively evaluating water damage requires a multi-faceted approach, combining visual inspections, moisture detection, and advanced tools. By employing these methods, you identify hidden issues and safeguard your environment against mold and health risks. Thorough documentation and professional assistance can streamline remediation and insurance claims, ensuring a thorough response to water damage challenges.
Recent Posts
Why Is Mold Removal Crucial After Water Damage?
When water damage occurs, mold can start to develop within 24 to 48 hours, creating
Mold Removal Strategies After Water Damage
You might think mold removal after water damage is a simple task, but it requires
What Are the Best Practices for Flood Cleanup?
When floodwaters recede, it’s vital to approach flood cleanup systematically. Start by evaluating the damage