Contents
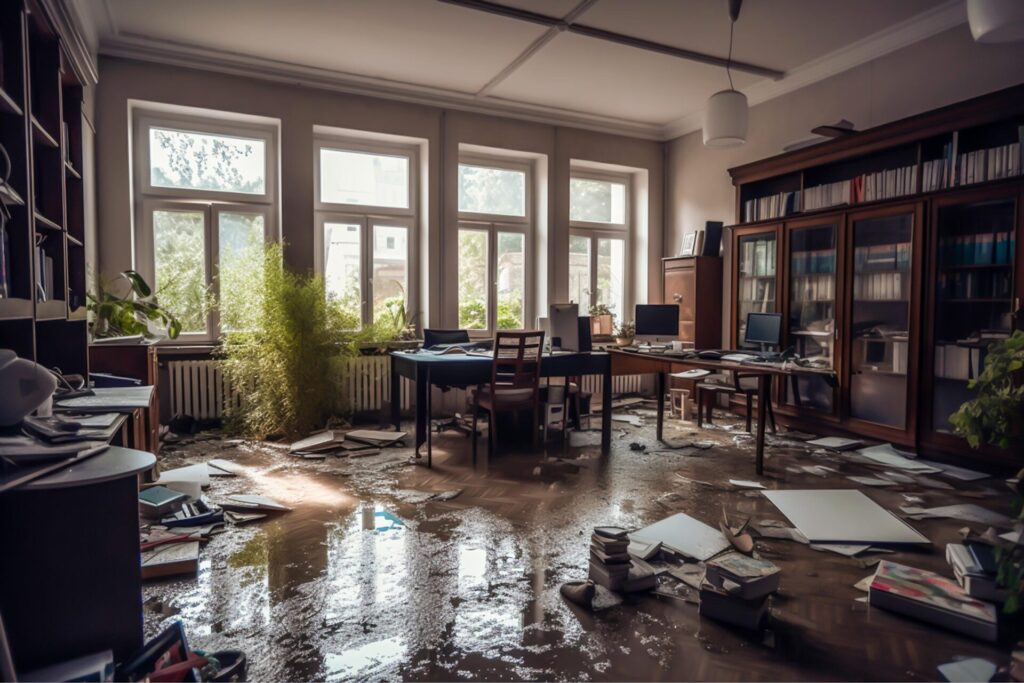
Flood damage can be devastating, but knowing how to tackle repairs can make a significant difference. You’ll need to start by evaluating the extent of the damage and documenting everything. Safety is paramount; you’ll want to ensure your environment is secure before diving into repairs. Understanding the step-by-step process can help you effectively restore your space. Let’s explore the essential DIY flood damage repair tips that can guide you through this challenging situation.
Key Takeaways
- Assess and document all damage with photographs, noting structural issues and moisture levels to prioritize repairs effectively.
- Always wear safety gear like gloves and masks before entering flooded areas to protect against hazards.
- Remove standing water promptly using pumps or wet vacuums, and enhance drying with dehumidifiers and fans.
- Clean and disinfect affected surfaces with mild detergents and bleach solutions to prevent mold growth.
- Install sump pumps and maintain proper drainage systems to prevent future flooding and water damage.
Assessing the Damage
When it comes to evaluating the damage after a flood, you’ll want to act quickly and methodically. Start your damage evaluation by documenting everything. Take photographs of affected areas, noting specific damage to walls, flooring, and personal items. This will aid in your impact assessment and help with insurance claims.
Next, assess the extent of water intrusion. Check for structural damage, mold growth, and compromised electrical systems. Use a moisture meter to identify hidden damp spots, as these can lead to long-term issues if not addressed.
Prioritize areas that require immediate attention, such as electrical outlets or weakened walls. Make a thorough list of repairs needed, estimating costs where possible.
This organized approach streamlines your repair process and ensures you don’t overlook critical issues. Remember, detailed damage evaluation now can save you from bigger problems down the road.
Safety Precautions Before Starting
Before you start any repairs, it’s important to prioritize safety to protect yourself and others in the affected area.
Begin by gathering essential safety gear, including gloves, goggles, and a face mask, to shield yourself from contaminants and debris. Verify your footwear is sturdy and waterproof to prevent slips and injuries.
Next, put together an emergency kit stocked with first-aid supplies, flashlights, batteries, and a whistle to signal for help if needed. Make certain your mobile phone is charged and within reach for emergencies.
Before entering the flooded space, turn off the electricity at the main breaker to avoid electrocution risks. If you suspect structural damage, consult a professional to assess safety before you proceed.
Finally, keep children and pets away from the work area to minimize risks. Prioritizing these safety precautions will help you work effectively and avoid potential hazards.
Removing Standing Water
Before you start removing standing water, make certain you’re wearing appropriate safety gear to protect yourself from hazards.
Use a submersible pump or a wet/dry vacuum to effectively eliminate the water, making certain you have the right equipment for the job.
Once you’ve collected the water, dispose of it in accordance with local regulations to prevent further issues.
Safety Precautions First
Although removing standing water may seem straightforward, it’s vital to prioritize safety to prevent accidents or injuries.
Before you begin, make sure you’re prepared for any potential hazards. Here are some essential safety precautions to take into account:
- Wear rubber boots and gloves to protect against contaminants.
- Turn off the electricity in the affected area to avoid electrocution.
- Use a mask to avoid inhaling mold spores or other hazardous particles.
- Check for structural damage before entering flooded areas.
- Keep a first aid kit and emergency supplies handy in case of injuries.
Use Proper Equipment
To effectively remove standing water, you’ll need the right equipment to ensure a thorough and efficient process.
Start with a submersible pump, which can quickly evacuate large volumes of water. Verify it’s functioning well through regular equipment maintenance—check the power cord, float switch, and intake screen for any debris.
Alongside the pump, use wet/dry vacuums for smaller areas or residual moisture. Employ proper tools like squeegees and mops to tackle the last remnants of water.
Remember, wearing protective gear is essential while operating this equipment.
After removal, inspect your tools to confirm they’re clean and ready for future use, maximizing their lifespan and effectiveness in subsequent projects.
Proper preparation sets the stage for successful flood damage repair.
Disposal of Water
Removing standing water promptly is essential to prevent further damage and mold growth in your home. Several effective water disposal methods can help you achieve this goal efficiently.
Use a wet/dry vacuum for smaller amounts of water.
Employ submersible pumps for large volumes of floodwater removal.
Utilize buckets to manually scoop out water if necessary.
Ensure proper drainage by directing water away from your foundation.
Consider professional help if the water level is significant or contaminated.
Drying Out Affected Areas
After a flood, it’s crucial to act quickly to dry out affected areas and prevent further damage. Start by removing any standing water using pumps or wet vacuums.
Next, employ effective drying techniques like using dehumidifiers and fans to enhance air circulation. Open windows and doors to facilitate cross-ventilation, which helps moisture escape.
For porous materials like carpets and drywall, consider removing them if they’re greatly soaked, as they can harbor mold. Place fans strategically to direct airflow toward damp spots, ensuring that every area is adequately dried.
Monitor humidity levels with a hygrometer; aim for a level below 60%. If possible, run your HVAC system as it can help pull moisture from the air.
Regularly check for dampness and rotate fans to promote even drying. By following these steps, you’ll minimize the risk of mold growth and structural damage.
Cleaning and Disinfecting Surfaces
Since floodwaters can carry contaminants, it’s essential to clean and disinfect all affected surfaces to ensure a safe living environment.
Start by using effective cleaning techniques to remove dirt and debris. Here’s a quick guide to help you through the process:
Wear protective gear: Gloves, masks, and goggles will keep you safe from harmful contaminants.
Use appropriate cleaning agents: Mild detergents can help remove the initial grime.
Disinfect with strong agents: Bleach solutions (1 cup per gallon of water) or commercial disinfectants are effective against pathogens.
Scrub surfaces thoroughly: Use brushes or sponges to make sure all areas are cleaned properly.
Rinse with clean water: This removes any residues from cleaning and disinfecting agents.
Inspecting for Mold Growth
While you may have successfully cleaned and disinfected your home after a flood, it’s essential to inspect for mold growth, which can develop quickly in damp environments.
Start by checking areas with high humidity or moisture, such as basements, bathrooms, and behind walls. Look for visible signs of mold, like black or green patches, and take note of musty odors that often indicate hidden growth.
To effectively manage mold, employ mold prevention techniques, such as maintaining low humidity levels and improving ventilation.
Use a moisture meter to quantify dampness and help target areas needing attention. Familiarize yourself with identifying mold types, including Aspergillus and Stachybotrys, as their presence can indicate a need for professional remediation.
If you find extensive growth, don’t hesitate to consult with mold specialists to ensure your home remains safe and healthy.
Repairing Structural Damage
Before you start repairing structural damage caused by flooding, it’s vital to assess the extent of the harm thoroughly.
Check for compromised walls, ceilings, and foundations to ensure structural integrity is maintained.
Use the following repair techniques to address the damage effectively:
- Inspect load-bearing beams for warping or cracking.
- Reinforce weakened foundations with epoxy injections or steel bracing.
- Replace damaged joists to restore floor stability.
- Seal cracks using hydraulic cement to prevent future water intrusion.
- Install new framing where necessary to support walls.
Once you’ve identified the damage, prioritize repairs based on severity.
Remember, keeping a close eye on structural integrity during the repair process is vital, as ignoring minor issues can lead to significant problems down the line.
Always consult a professional if you’re unsure about any repair techniques.
Replacing Damaged Flooring
To replace damaged flooring after a flood, start by evaluating the extent of the water damage to determine which areas need replacement.
Once you’ve identified the affected sections, choose replacement materials that match your home’s aesthetics and meet durability requirements.
This ensures a seamless and long-lasting repair that can withstand future moisture exposure.
Assessing Water Damage
As you assess the water damage in your home, identifying the extent of the affected flooring is essential to determining the necessary repairs.
Start by locating the water source to understand how it impacted your flooring. Conduct a thorough damage assessment, focusing on these key areas:
- Check for warping or buckling in the flooring.
- Look for discoloration or staining on the surface.
- Feel for softness or sponginess, indicating hidden damage.
- Inspect the underlayment or subfloor for moisture.
- Evaluate the presence of mold or mildew, which can indicate prolonged exposure.
Choosing Replacement Materials
When selecting replacement materials for your damaged flooring, it’s crucial to evaluate both durability and compatibility with your home’s existing aesthetic.
Consider sustainable materials like bamboo or cork, which stand up to moisture and offer eco-friendly benefits.
Look for cost-effective options such as vinyl or laminate, which can mimic the appearance of hardwood without the hefty price tag.
Be sure to select materials that are water-resistant to prevent future damage and ensure longevity.
Additionally, check for warranties and maintenance requirements to help you make an informed decision.
Preventing Future Flood Damage
While flooding can be unpredictable, you can take proactive steps to minimize the risk of future damage.
Implementing effective flood prevention strategies and drainage solutions is key to safeguarding your property. Here are some essential tips to take into account:
Install sump pumps to manage excess water in basements.
Create proper grading around your home to direct water away from foundations.
Maintain gutters and downspouts, ensuring they’re clear and extend away from the house.
Use permeable paving for driveways and walkways to enhance drainage.
Seal cracks and gaps in your foundation to prevent water infiltration.
When to Call a Professional
When facing extensive water damage, it’s vital to assess whether the situation exceeds your DIY capabilities.
If you notice structural concerns or suspect mold growth, it is essential to call a professional to ensure your safety and the integrity of your home.
Don’t hesitate to seek expert help when the risks outweigh your repair skills.
Extensive Water Damage
If your home has suffered extensive water damage, it’s crucial to recognize the signs that signal the need for professional help. Relying solely on DIY methods may put your home at risk, especially when it comes to safety and thorough restoration.
Here are key indicators that it’s time to call in experts:
- Persistent mold growth, even after cleaning
- Extensive water saturation in walls or floors
- Unpleasant odors that linger
- Damage exceeding your flood insurance coverage limits
- Electrical hazards or appliance malfunction
In such cases, water restoration specialists can assess the damage, ensure safety, and expedite the recovery process, helping you navigate the complexities of insurance claims while restoring your home effectively.
Don’t risk further issues—act promptly!
Structural Concerns
Even minor water damage can lead to significant structural concerns that may jeopardize the integrity of your home.
If you notice sagging floors, cracks in walls, or doors that stick, it’s essential to assess the situation promptly. These issues often indicate compromised foundation integrity due to moisture retention. Water can seep into materials, weakening the overall structure.
If you suspect extensive damage or if your home is older, don’t hesitate to call a professional. They can conduct a thorough evaluation, identify hidden problems, and recommend appropriate repairs.
Mold Growth Risks
Mold can quickly become a serious issue after flood damage, especially in areas with high humidity or poor ventilation. If you notice any signs of mold, you shouldn’t wait.
Here are key indicators that it’s time to call a professional:
- Visible mold growth on walls or ceilings
- Musty odors that linger despite cleaning
- Water-damaged materials that haven’t dried
- Allergic reactions among household members
- Extensive water damage beyond surface level
For effective mold prevention, act fast to dry out affected areas and consider mold testing if you’re uncertain about the extent of the problem.
Professionals can assess the situation, ensure thorough remediation, and help prevent future outbreaks, safeguarding your home and health.
Recap
Just like a phoenix rising from the ashes, your home can bounce back stronger after a flood. By carefully evaluating the damage, prioritizing safety, and methodically tackling each repair task, you’re fixing a space and rebuilding a sanctuary. Embrace sustainable solutions to guard against future storms, and remember, sometimes it’s wise to seek out expert help when the waters get too deep. With determination, your home can flourish once more, turning hardship into resilience.
Recent Posts
Top Tips for Storm Damage Restoration at Home
Many homeowners experience some form of storm damage. When faced with such unexpected challenges, it’s
What Are Top Tips for Sewage Cleanup?
Is it really possible to effectively manage a sewage cleanup without proper preparation? Many underestimate
Effective Strategies for Sewage Cleanup and Restoration
When dealing with sewage cleanup and restoration, it’s imperative to approach the situation methodically. You’ll